_

Sunday, March 23, 2014

Imagine Dragons

I am so excited to introduce this lesson to my second grade class this week. We're going to start by reading the book "There's no such thing as Dragons."


Then we will imagine what a dragon looks like and draw it onto transfer paper. It will become a scratch art lesson in texture and finally part of a larger illustration where students get to become a fire-breathing dragon as they shoot orange paint through a straw with their own breath.


This lesson could definitely evolve for upper levels. Tying into popular fiction such as Harry Potter, How to Train your Dragon and Eragon. I've swiped a few of my daughter's favorite books to take in and share such as "Room on the Broom" and "That's not my dragon."

What's your favorite dragon book to use in the art room?

Friday, March 21, 2014

Weaving

Working on a new way to introduce paper weaving to my first grade classes. This lesson starts with a  10 minute powerpoint. I am hoping they will sit still for me!

Wednesday, March 12, 2014

Printmaking Lesson

4th grade is finishing up their printmaking projects. Having them use a gridded drawing really helped. Each students made up to four prints and selected their two best to turn in for grading. Some of the students really liked and chose to include their ghost print.


Wednesday, March 5, 2014

Georgia on my mind


This year's Crayola grant had me revisiting my Georgia goes 3D lesson. I changed the approach by having students START with the cup/vase design so they had a place to store the flowers as they were created. We read a Georgia O'Keefe biography and created the cups the same day. Tip: I wrote their initials on the bottom of the cup before they arrived. I wrote them with a colored sharpie to match their table color. If I'm going to have 90 of these sitting around I better be able to figure out who they belong to!


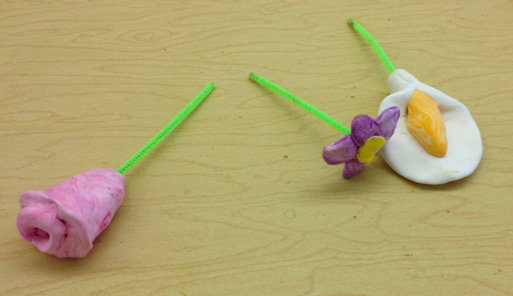
2nd class: We used old modeling clay in the bottom of the cup to weigh it down (also a great way to get rid of all the modeling clay they ends up gray/brown that no one wants). They rolled it into a sphere. Tapped the bottom flat and pinched the top. It looked like a hershey's kiss. Then as the flowers were created, we attached the flower heads to pipe-cleaners and inserted into the modeling clay. I didn't bother to have the wrap the stems in clay this year. We saved that and let them do a second week of flower making.


After the last flower was done, we added tissue paper around the stems to hide the modeling clay. At one of my schools I have a lovely display case that I can load from inside my room and it faces the hall. I was able to store work there in progress. It was fun for the whole school to guess what would blossom.


 So very pleased.