_

Showing posts with label art education. Show all posts

Sunday, June 1, 2025

Toy Story Gets A Glow Up

One of my favorite two point perspective lessons for my upper elementary students was inspired by the movie Toy Story. This year, I finally did not have any of my previous students who completed this lesson in a high school class and was able to move that lesson up to Art 1. 


If you've been following this account for awhile you already know  I've been mixing up my two point perspective lessons over the past 4-5 years trying to find something that resonated. We did perspective rooms, streets and houses. We've done them in pencil, watercolor and acrylic. Nothing was hitting the way that Toy Story lesson always seemed to with the younger kids, so I thought "why not?" The great news is that 14-18 year olds are still inspired by Toy Story. We are a 1:1 ipad school and my students are lucky enough to have the procreate app. 

The basic format of my perspective unit still remained the same. Starting with 1 point boxes, comparing 1 and 2 point perspective. Introducing angles like bird's eye and worm's eye. One of the fun ideas I added to this recycled lesson was showing short 3-5 minute clips from the movie and freezing the screen. This allowed students to identify the horizon line, vanishing points and angles.

I had a collection of toys in the room with a set up for them to photograph for reference and they were welcome to bring their own in as well. All students experienced a high level of success with this lesson and were eager to work on it. I find with paper pencil, students get so discouraged having to erase the lines over and over again, ruining their paper. This felt like the perfect time to go digital.

If you'd like to "just press play" on this video heavy resource you can find it here.

If you're an elementary teacher who'd like to see the original post use this link.


Sunday, May 18, 2025

Seasonal Grid Drawings

Semester 2 proved to be a little more challenging for the new square paper / no measure grid drawings. In the fall we used leaves, which were readily available for both students and myself. I brainstormed other items that might provide a similar range of challenge and came up with a few. If you're looking for more grid drawings, I have now added:

Food (lemons, peppers, red onions)


White Eggs (on neutral backgrounds, in cartons and on plastic easter grass)


Pool (Billiard) Balls 


Here is the fun set up in my home when I realized I could borrow the balls from a neighbor but did not have my own table. Thankful my daughter has sweatshirts in EVERY color

What objects have your students enjoyed drawing using the grid method?


Monday, December 2, 2024

Square is where it's at for grid drawing

I've been a HUGE fan of grid drawing my entire career. Starting with my elementary kids I would introduce the concept of using grids to my students often with preprinted grids on cartoon characters as an early finisher activity. 


As students mature in their skills we transfer the responsibility of grid making to them. And you know who doesn't love a grid project? Every student who struggles with reading a ruler. Sure, there are workarounds. I can print the grid on it for them, they could work on gridded paper or worksheets. They can use a light box to trace a pre-drawn grid, we can place a grid on top digitally. When drawing isn't the main skill, like this printmaking lesson that is a great accommodation.


Most of those techniques require a lot of extra preparation from the teacher. They also take away what students need to use this technique again on their own: the ability to execute a grid, consistently on the reference photo and their own paper. Let's face it, if they can't make a good grid, it's not a helpful tool. In this case, the grid becomes a barrier to success.


This year I started using a NO MEASURE grid method. If students can draw a straight line from corner to corner, they don't need to measure a thing. The only limitation to this method are that you must either use a square or make sure the reference photo and the final paper are the same proportion. Both of these steps require no extra effort, time or resources from the teacher.  We tested this new format with a colored pencil leaf drawing. After seeing the boost in confidence for all of my students I decided to create some additional lessons that are ready to go for a sub at a moment's notice. You can find the whole bundle here.


In this resource I include a step by step video demo of not just how to set up the grid, but how to see implied lines in a photo to convert a photo into a line drawing. This is an important step to teach. Not all students can visualize what you are asking them to do. We start with a basic star shape to help them see the lines where there are none.


If you'd like to check out this method, you can download a FREE sample here

Saturday, September 21, 2024

Teaching Abstract Art With Paul Klee

When it comes to introducing children to the world of abstract art, I find Paul Klee is one of the most captivating and approachable artists. His playful style lends itself to a variety of engaging art projects that are scalable for different age groups and abilities. Here are some of my top reasons to start with Klee when teaching abstract art

1. Imagination and Playfulness

Klee’s work is infused with a sense of play and imagination that resonates with children. His use of bold colors and shapes invites viewers to interpret the artwork in their own way, encouraging creativity and personal expression. When teaching kids about Klee, I like to emphasize the importance of imagination in art, prompting students to push their boundaries and create their own abstract pieces.


2. Accessible Techniques

Klee often employed simple shapes and lines in his compositions. This accessibility makes it easier for children to replicate his techniques in their own artwork. Whether it’s through drawing geometric shapes or experimenting with color mixing, kids can engage directly with Klee’s methods, fostering a sense of accomplishment and confidence in their artistic abilities.

3. Exploration of Color and Emotion

Klee was a master of color, using it not just to please the eye but to evoke emotion. He believed that colors could express feelings, which is a powerful concept for children to explore. Educators can guide students in understanding how different colors affect mood and perception, encouraging them to choose colors that resonate with their own feelings in their creations.


4. Cultural and Historical Context

Teaching about Paul Klee also opens the door to discussions about the historical context of art. As a part of the Bauhaus movement and influenced by various styles, Klee’s work can serve as a springboard for conversations about modern art, the evolution of artistic expression, and the connections between art and culture. This contextual understanding can enrich students’ appreciation of art beyond just aesthetics.

5. Diverse Subject Matter

Klee’s subjects ranged from playful to profound, often reflecting themes of nature, music, and childhood. His ability to blend reality with abstraction allows children to explore various topics, from storytelling through art to interpreting the world around them. This versatility can inspire students to create pieces that reflect their own experiences and interests.


6. Encouraging Individual Interpretation

One of the most exciting aspects of abstract art is its inherent ambiguity. Klee’s works invite multiple interpretations, teaching children that art doesn’t have to depict reality in a literal way. This can encourage critical thinking and discussion among students, as they learn to articulate their thoughts about what they see and how it makes them feel.


Saturday, August 17, 2024

Open House Ideas for the Art Teacher

Open house is a great time to make or solidify connections with your school community. If you're in a school that doesn't have a formal program or tour you may be wondering what to do in your room. Here are my top 6 ideas to maximize this event for you.

1. WISH LIST

Classroom teachers are not shy about putting together lists of everything they need for their students to be successful in their room. You don't need to be shy either. Maybe you truly love dumpster diving, but if not, I suggest hanging up a tear-tab style poster on your bulletin board or door. 


2. ARTSONIA/FUNDRAISER SIGN UP 

If you participate in Artsonia you are going to need parent permission for any new students. If you aren't using artsonia this post walks you through the many benefits I have found using this program in my school and how to get started. 

If you participate in any of the single project fundraisers or "art show" style fundraisers you will probably want to seek the help of your PTA or individual parents. Open house is a great time to capture their attention and enthusiasm. So grab a clipboard and start a volunteer sign up sheet. 


It's also great to have your artsonia site up on the projector with looping slides of student work. Another great place to do this is in your auditorium or gymnasium. It reinforces the value of art, and is a great reminder for parents who may not have signed up in previous years.

3. ART GALLERY APPLICATIONS

Parents of even the youngest students are often looking for opportunities for their children to engage in activities beyond the school day. One of the best things I did for my school was to start a student-led art gallery. Students met a few times beyond the school day (conveniently times when I already had to be in the building but was not actively participating in meetings) to help with mounting artwork, hanging displays in the hallway, photographing art for our online art gallery and leading tours as docents for the art show. Have plenty of applications on hand for this event while parents and students are in your room increases the chances of filling those positions. This resource contains all the forms needed to start your own.

Not sure you're ready for an art gallery? You could also have a sign up sheet for parent volunteers to cut paper, mount artworks on paper or hang displays in the hallway.

4. COMMUNAL COLORING

Our open house takes place the week before school starts. So my hallways are typically empty. I like to roll out some bulletin board paper and invite students to color (a little or a lot) while their parents are completing some of the above mentioned activities. You can write an inspiring quote, or outline some art supplies, whatever would go over well with your populations. Now you have art ready to hang up for the first day of school until students finish some projects to hang in the hallways. The bonus? Since these don't belong to any one student, roll them up and now you have decor ready to go for NEXT YEAR'S open house. 


Another option would be ready to go coloring pages of single objects like art supplies that students can color and then staple to the bulletin board. You could have prepared bunting pieces that spell out your school name, or welcome back.


5. BUILD YOUR SOCIAL MEDIA PLATFORM

If you want parents to like, follow, subscribe to your art blog, instagram, etc this is the time to grab their attention. I set up a "selfie-station" and asked parents to post their favorite picture from the night and to tag the art social media account. Then make sure to like each post and you will find most parents follow you back. This is the place where you announce your art shows, art contests, request for donations and more. But it all starts by building your audience.


6. HANDOUTS
I firmly believe in teaching parents how to have productive conversations with their kids about art. This handout is a great way for parents to open the line of communication. I try to model these questions in front of parents as students are participating in free draw or coloring in the banners.


If you have a formal program or must present to groups of parents, I would suggest this drag / drop  Meet the teacher format. 


Saturday, April 13, 2024

Earth Day Resources for Art Teachers

In the colorful world of art education, every stroke of paint and every sculpted form carries not just the weight of artistic expression, but also a commitment to environmental stewardship. While Earth Day may serve as a poignant reminder of our collective responsibility to protect the planet, art teachers embody earth consciousness every single day, weaving sustainability into the fabric of their classrooms.


In this post, several of my favorite art teachers share their best practices and classroom-tested lessons as we we explore the benefits of recycling in the art room. From repurposing materials and fostering creativity to instilling a sense of environmental responsibility in their students, these educators exemplify a dedication to preserving the Earth that extends far beyond a once-a-year celebration.

COST-EFFECTIVE SOLUTIONS

Art supplies can be expensive, especially for schools with limited budgets. Recycling offers a cost-effective alternative by utilizing materials that are readily available at little to no cost. From cardboard and newspaper to plastic bottles and bottle caps, the possibilities are endless. By creatively repurposing these materials, educators can stretch their budgets further and ensure that all students have access to the materials they need to unleash their artistic potential. Amie from Glitter Meets Glue is ready to share how she incorporates this in her classroom.

"My absolute favorite way to get the best bang for your buck in the art room is to implement a yearlong artist trading cards project. They’re miniature art projects the size of a playing card. And they cost nothing to create!
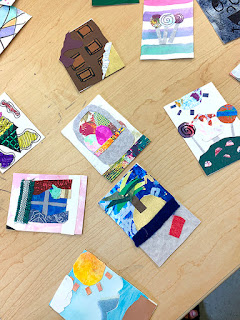
After every art project, collect the “good scraps,” as I call them, in a garbage bag. Think: leftover painted papers, bits of construction paper, gift wrapping paper, feathers, beads, felt, fabric, etc. Basically, any project remnants you considered tossing or don’t have enough to use for even one class, toss in the bag. 

After I’ve collected a big bag of random materials, I fill large bowls with the scraps for students to create artist trading cards. They cut, glue, color, and paint unique artworks that they can trade later on in the year with friends. On the last day of school, I do an all-day ATC exchange. The kids love it and it’s always such a huge hit at a very chaotic time of the year!"

If you’re interested in getting started on artist trading cards, check out her complete teacher guide, lesson plan, worksheets, and PowerPoint slides. She'll walk you through the entire process.

RESOURCEFULNESS AND CREATIVITY

Limitations often fuel creativity, and recycling presents the perfect opportunity for students to think outside the box. By repurposing materials that would otherwise end up in landfills, students are challenged to find new uses and innovative ways to incorporate them into their artwork. This encourages resourcefulness and cultivates a mindset of creative problem-solving—a valuable skill both inside and outside the art classroom. Whitney from Look Between the Lines has some impressive 3D inspiration for us:

"My favorite Earth Day project is my found object assemblage project. This is a great way to bring sculpture into other art classes or focus on a found object-style sculpture in your sculpture classes. This can be introduced on Earth Day, with a focus on what materials can be reused and turned into a work of art. My favorite found object artists are Tara Donovan and John Dahlsen, I use them as artist exemplars to inspire my students before they start their project. Students are responsible for collecting their materials. While waiting for materials to come in they prep wood panels, where they attach their materials, brainstorm and research ideas, and sketch out designs. Experimentation and thinking ahead are key to creating a successful work of art. I also recommend having an in-progress and final critique with students as they work on their assemblages. 
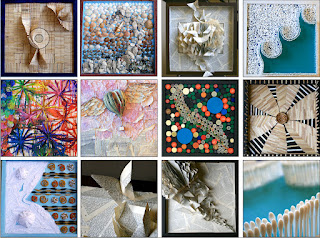

This project can be taught to students as young as 5th grade, I recommend working on one piece as a class project. For middle schoolers, I encourage small groups of students to work together. In high school, students can pair up or work individually."

Read more detailed information about Whitney's Earth Day assemblage project here or hit the easy button and get the lesson pack with everything you need to teach the project (minus the supplies) here. 


EMPOWERING STUDENTS THROUGH OWNERSHIP

"Embracing recycled materials as art supplies in an elementary classroom is not only cost-effective but also instills a sense of environmental responsibility in young students. Sorting bins for various reusable items such as cardboard, scrap fabric, colored paper, string, and containers transforms waste into a treasure trove of creative potential. This approach encourages children to see the value in everyday items, fostering a culture of sustainability and innovation. For instance, cardboard pieces can become the canvas for a collage, string and fabric scraps can be woven into a textured tapestry, and old containers can be transformed into whimsical sculptures. Such activities nurture creativity, as students learn to work with what's available, adapting their artistic visions to the materials at hand. This method is particularly beneficial for schools with limited budgets, offering endless possibilities for artistic expression.
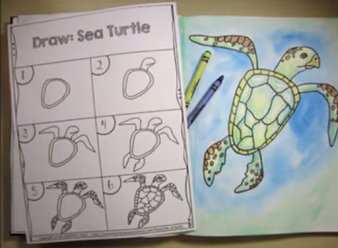
Directed drawing activities, like the Earth Day Themed Directed Drawings, provide a structured yet flexible framework for art projects. These guided exercises can be adapted to whatever materials are on hand, allowing students to choose from a variety of mediums or work with specific ones based on current supplies. This not only enhances their drawing skills but also teaches them to be resourceful and imaginative, key qualities in both art and life. "

If this sounds like the perfect activity for you, visit her website to plan quickly and teach confidently.

BUILDING CONNECTIONS

Recycling in the art classroom provides an opportunity to forge connections with the broader community. Partnering with local businesses, recycling centers, and environmental organizations can enrich students' learning experiences and expand their understanding of sustainability initiatives in their community. Many times art teachers are the recipients of large scale donations of random materials from community partners. Next, Sabrina from A Space to Create Art shares an example of how to use donated boxes or containers to creating meaningful artworks.

"In this assemblage piece, high school and middle school art students learn about artist Joseph Cornell and create a mixed-media sculpture inside a mint tin. Their art is based on a famous novel’s quote or theme. By marrying visual art and literature, they delve into the nuances of storytelling, exploring themes, characters, and settings in a tangible and tactile form.

Joseph Cornell was known for his pioneering work in assemblage art. Cornell's distinctive style transformed found objects into captivating compositions housed in shadow boxes and glass-fronted cases. His pieces often evoked a sense of nostalgia and wonder, blending elements of surrealism and collage to create dreamlike worlds.

As students breathe life into their sculptures, they embark on a personal and introspective journey. Each sculpture becomes a testament to the power of imagination and the transformative nature of art. Below is an example created by a student based on the novel The Great Gatsby by F. Scott Fitzgerald."
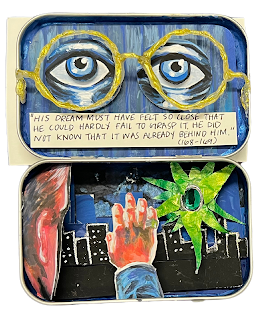
You can find this lesson ready to teach at A Space to Create Art on TpT or on her website: www.aspacetocreateart.com

FOSTERING ENVIRONMENTAL CONSCIOUSNESS

Exposure to Earth-friendly art-making approaches can encourage our young artists to think in a globally conscious, macro beneficial way. By being environmentally-thrifty and eco-aware in our art teaching, we potentially seed future creative solutions in our artists, while providing them with some ‘food for thought’ regarding their own use of the earth’s limited resources.”


In her blog post here, Stephanie shares a few practical tips for earth-friendly (and budget- conscious!) art materials, equipment and supplies. Check out her TPT store here here.

CONCLUSION

Integrating recycled materials and sustainable practices into your art room offers a multitude of benefits that extend far beyond the school day. Changing a few habits or lessons each year can have a monumental impact over the course of your career.  Need help getting started? My previous post on Earth Day lessons has several project ideas you can incorporate easily.  By embracing recycling as an important part of the artistic process, educators have the power to inspire future generations to create positive change—one masterpiece at a time.


ART TEACHER-AUTHORS THAT CONTRIBUTED TO THIS ARTICLE:

Stephanie from Picassa’s Palette
Amie from Glitter Meets Glue
Whitney from Look Between the Lines
Kathleen from Ms. Artastic

Tuesday, July 25, 2023

2023 2024 Art Teacher Planner

Evolution of an art teacher plan book (left to right)

When I was teaching in 3 elementary buildings per week it didn't make sense to carry a plan book back and forth between buildings. During those 8 years, I kept a digital planbook in excel. It was really just a snapshot of what we would do each day. I had a tab for each school so I could plan from anywhere. I printed out my formal lesson plans and left those on the desk for subs just in case.

Fast forward to 2020. I couldn't wait to be done looking at a screen after remote teaching. I resorted to a plan book that was scraps of paper and sticky notes all over the place. So I went back to a paper planner. 

Over the past several years I have been modifying and tweaking my planbook and upon request making the templates available on TpT. One major change is transitioning away from "block" style to a self dividing layout like this one:


I love the flexibility this offers. If we're in progress on a lesson, I don't need the same amount of space as an intro day. This is also a good visual cut to how crazy the day is going to be and helps me prevent have a day of intros in every class. If there is too much to fit in that column it's going to drain my battery. So sometimes I will switch things up when I see how the different classes are going to align. 

Recently, I have noticed is a need for more "communication logs" to document parent conversations. 


I like to put my Note to Subs on the first page opposite my schedule.  


This year I added a beginning of year checklist. We do many of these things on autopilot but it feels good to check them off!


Year at a glance important dates. I fill this in during the 1st faculty meeting of the year. It's helpful to refer back to this timeline things like standardized testing, etc.


Monthly calendar - I go with M-F only to allow more space. The weekends are mine and don't need to be in my school planner. 


I alternate a notes page with a coloring page (because sometimes those meetings aren't really for art teachers)


Quick place to jot down any supplies that get used up. 
All in one handy spot for ordering at end of year.


The Visual Art Standards quick reference in the back of book as well as an End of Year Checklist. This is new this year, but I found our district checklist had a minimal amount of items that didn't encompass what I really need to do to close out my room for the year.


Here's what it looks like all put together for this year:


What are some must have non-negotiable features in your plan book?