_

Showing posts with label digital art. Show all posts

Wednesday, May 5, 2021

Digital Flower Drawings in Procreate


This year I used a hefty chunk of my budget to purchase licenses for my students to have procreate installed on their ipads. I've been sprinkling some assignments to get them warmed up, but we haven't done a full project yet. So far they learned how to change the color of a photo, how to make a grid to use for a physical drawing, how to use the perspective mode to draw the framework of a room in one point perspective and how to add and edit text.


They also have a weekly sketchbook assignment. This week, I asked them to follow Lisa Bardot drawing a flower digitally. Sketchbooks are a minimal amount of points, but my objective is for them to put in time practicing each week and improve skills. They are blowing me away with their flower drawings this week. So excited to share the first few that I received today.


I am hopeful that some of the fully remote students have the ability to print these out. And just in time for Mother's Day (not my original intent, but how perfect would it be?)

Sunday, April 26, 2020

Distance Learning For Teachers

One of the great things to surface during this crisis has been a return to hobbies. As a member of many online drawing groups, it has been great to see the abundance of people taking time to be creative. I have really enjoyed the time to participate in live drawing tutorials with digital brush designer Lisa Bardot. 

She offers daily drawing prompts in her making art everyday group. Her brushes are the first ones that really feel like I am creating with actual (non-digital) media. Right now her brushes are on sale if you want to check them out.** 

Here are a few items I created this week in her draw along sessions.  


This artwork was done using the "Midcentury" Brush set


This artwork uses the "multiply" blend mode to create a screenprinted limited palette effect


This artwork used the symmetry assisted drawing function. 

Some of the things I've learned from Lisa's tutorials may eventually find their way into some lesson plans in the future.


**
This is not a sponsored post. I have purchased all the brushes used in the artworks above.

Saturday, February 22, 2020

Highlight Your Art Program at STEAM Night


Does your school host STEAM night? A few years ago, our school decided to combine several of the evening activities into one. There used to be a separate night for science fair, and a math and literacy night and the art show (which was held off site). Combining these items for one special night made lots of sense and was appreciated by the parents.


The first year I hosted a pendulum painting activity and there was a line all night long. I didn't realize at the time, that I should not have set up my tripod on the floor. I strongly recommend a tabletop version if you plan to assist the students in loading the container with paint, or holding the container in place while they get paper into position. It will save  your back! You will also want a drying rack on wheels. I had to pass back the work to homeroom teachers the following day as it was too wet to take home. Original post with more specifics on pendulum painting here.


Last year I opened up our student art gallery during STEAM night. The members of my "frame shop" hung exhibits with a STEAM connection in the two hallways that I've taken over upstairs. (More on setting up your own student-led art gallery here). The docents worked on practicing their script and led tours. The challenge was getting people to come upstairs. I felt bad having the students "recruit" people from the gym, where the other activities were held to view the art, especially some of the grandparents and parents with strollers.


This year I decided to move some exhibits downstairs and allow self-guided tours of the steam focused projects. Third grade showed off their digital 1-point perspective drawings (lesson here) and fourth grade exhibited the digital cake drawings (lesson here).


Since I did not have to monitor the student docents, it freed me up to work a station again. Connecting to science, I chose the concept persistence of vision and highlighted student animation projects from each grade level. I printed out information and/or made samples of thaumatropes, phenakistiscopes, zoetropes and flip books for them to view. As a make & take activity I offered roll up animations and thaumatropes (historical animation info here). One of the highlights was the 5th grade animation projects(lesson here). I brought my ipad and had student samples looping for parents to see the natural progression of the curriculum and the students were proud to show off their work (lesson here).


What's your favorite STEAM activity to share with parents?

Saturday, February 8, 2020

Acing the Cakes


4th grade just finished drawing their cakes on the ipads using procreate.


We did this lesson last year for the first time. The students this year did not disappoint. Original post about the digital cake drawing here.


The requirements were to use two or more colors on their cake, to include a cake topper or base and to use a texture or patterned brush in their image.


The video demo and lesson plans are offered here. If you're looking for tips on organizing a class set of apple pencils, that info is right here.

Saturday, February 1, 2020

3rd Grade Digital Perspective Drawings


3rd grade has been learning about 1 point perspective.


We started with photos taken of the hallways in our school. 


Students learned how to use the procreate app and created these amazing drawings. 

We didn't even use the "perspective" mode - this is from their observations.  


So proud and impressed. I love how some stayed true to the color palette of our school, and some just went for it with color everywhere. Their choices most definitely reflect their personalities and style.  I have a lesson plan with video tutorial posted here. If you're wondering about how to set up and organize the technology in your room, check out this post on how I manage 30 apple pencils in the classroom.

Saturday, January 25, 2020

Digital Drawing with Procreate


Guess who went 100% digital this week with 3rd - 5th grade?


Hint: This person may also have gotten a haircut and felt the need to update her profile pictures.

So. Third grade is currently working on one point perspective drawing using the procreate app on their ipads. Fourth grade is working on drawing Thiebaud style cakes and fifth grade is making animations. Spoiler alert: So. Many. Layers.


After repeating the introduction to using the basic drawing tools in procreate three times, I used the screen recording feature to make a demo video. This has really freed me up to walk around and see who's struggling, who's goofing around and who should probably be teaching the lesson. It will also be great to show the kids who were absent!

Looking forward to sharing their creations with you. In the meantime, if you're looking to work with procreate in the classroom and have no idea where to start, this is my intro video. This is the cake project. Original post here. This is the new animation project. 

If you're looking for help with all kinds of technology, this post from last year is a behind the scenes look at how I manage 30 apple pencils in the classroom... and this is my technology bundle.  It includes other items like stop motion and forced perspective photography. If you are looking for procreate lessons only, this is my new procreate digital drawing bundle.

What are your biggest challenges / successes with technology in the art room?


Saturday, May 4, 2019

Apple Pencil Classroom Kit Set Up

When I posted some of the kids digital drawings online, there were lots of questions about the set up, distribution and handling of the apple pencils. I get it. They are EXPENSIVE and fragile. Two words that make me a little nervous around 9 year olds.

Our district purchased a class set of 30 for the 6 elementary art teachers to share. Our coordinator has us sign them out for a period of time and when the next teacher wants to use them they travel. To accommodate a traveling set we use the following set up:


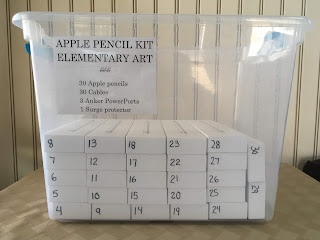
I know. It looks like a hot mess up in there, but I'm gonna unpack it for you.
So first, there are the boxes that they came in. One idea we had was to number them, match them up to the kid's number and have them set the box on their table to place the pencil back in the box. One teacher test drove that plan and found it wasn't too practical. So most of the time, the boxes just sit empty in the big tub. Like this:
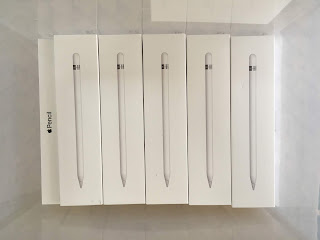


Since students need to take the cap off to pair the device to their tablet, we had to decide what to do about the caps. We envisioned them getting lost. The alternative was not giving the students the caps. That leaves the end exposed. After weighing the pros and cons, we went with that option and store the caps in a smaller container with extra pencil tips and anything else that is tiny. We keep them plugged into the chargers whenever the students aren't using them.


We have a surge protector for charging. It has three plugs for each of the Anker Powerpots. These can charge up to 10 pencils at a time in a very compact space.
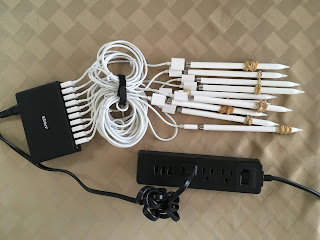


We leave the wires all bundled up and out of the way. Leaving them at the full 3' or 6' length would probably mean a huge tangled mess or that they would get knocked onto the floor. Here's what it looks like with 3 units plugged in at once.


When it's time to send them off to the next teacher the pencils go back on the boxes and away they go.


Some other tips for classroom pencil use. With our situation, I told students the pencil had to sit on top of their ipad whenever they got up from the table or weren't using it. Their ipads have a rubber case that sticks up around the edges, so it won't roll off the ipad if it's lying flat. Those pencils are slippery and roll fast so I added a rubber band to each one to act as a pencil grip and to slow down the rolling.


What are your best secrets for managing apple pencils in the elementary art room?

Friday, April 19, 2019

Wayne Thiebaud Cake Remix


The Wayne Thiebaud cake lesson. If you've seen one, you've seen 'em all. That's how I was feeling. This lesson had gotten stale and I needed to kick it up a notch to keep my 4th grade artists engaged.


A few weeks ago I reached out to one of my favorite instagram artists. Anastasiya Levashova is an amazing contemporary illustrator who paints drool-worthy confections among other things. It was the perfect balance to the artwork of Wayne Thiebaud. To get started I asked the artist for permission to print some of her cake images to inspire my students. I was so delighted to hear from her the very next day and she even asked to see their work when finished. How sweet is that?


In this remixed lesson I presented Thiebaud as the past, Anastasiya as the present and suggested that they could be the next great cake artist.  Sharing a little about Levashova opened the conversation up to different career paths and options for artists today. This was the missing link. Adding the contemporary artist into the mix made the lesson much more relatable to my students. The next logical step was to move our media into the 21st century.


Our district purchased a class set of apple pencils (I know, spoiled!) for the 7 elementary schools to share. So when it was our turn, I knew I had to make the most of it. Not only were they using a stylus for the first time, we were using the procreate app on their ipads (yes, completely and utterly spoiled).


Here are some more of their amazing cakes:


 If you like this lesson you will surely want to follow Anastasiya on Instagram.


My lesson plan and support materials to help your students succeed are available here.