_

Showing posts with label hacks. Show all posts

Wednesday, February 12, 2020

magnetic photo frames

These 4x6 magnetic photo frames are great for organizing supplies on my metal carts.


I have extra pictures behind the front label, so I can quickly swap things out if needed. I get mine at a local photo store, but you can find similar here.


I have also used them in the past to organize my goals, etc on the whiteboard


(or in this case, ancient green board). More on this system here.


All my favorite art teacher organization hacks are included in this free download.

Wednesday, July 17, 2019

Art Center for Early Finishers

As I was answering a post on an art teacher Facebook group, I realized that I never shared my new art center from this past year. I've always had a free draw situation, but wanted to link my early finisher activities to a classroom management system. And so my art center was born.


I use a point system for students to earn and track points to "unlock" more shelves. If you've been wanting to try something similar, check out this resource to create an art center in any space...even when you share a room or are teaching on a cart. There is a video about how that works on my instagram highlight.


My complete set up guide with walk you through the questions you need to ask yourself to make the art center of your dreams. It's jam packed with photos of many different set ups as well as samples of my point tracking system to maximize student buy in.

New to teaching? This is part of the ultimate guide for new art teachers. Check that out here.


Wednesday, May 22, 2019

New Art Teachers Save Your Sanity

This is about the time of year that the facebook groups are alive with newly hired teachers. Excited and maybe a little overwhelmed they are ready for the next phase of their journey. I saw a few posts today and it reminded me to update my art teacher's guide to organization. With my new room (Room #14 in my 14 year teaching career...but who's keeping track?) came new challenges and new opportunities. I'm already excited thinking about how I'll be reinventing that space next year. But in the meantime, please enjoy this free guide!

Here are some of the new features:

Art Gallery Helper Station

Artsonia Binder 


Supply Cart with Magnet Labels


Finally... The Eraser Garage. It's life changing. For real.


If you're a first (or second) year art teacher...this guide specially designed for the questions of new art teachers may be just the thing for you.


Saturday, May 4, 2019

Apple Pencil Classroom Kit Set Up

When I posted some of the kids digital drawings online, there were lots of questions about the set up, distribution and handling of the apple pencils. I get it. They are EXPENSIVE and fragile. Two words that make me a little nervous around 9 year olds.

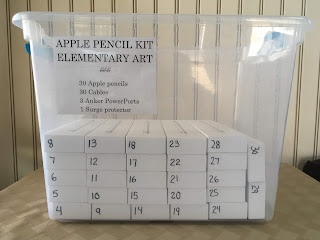
Our district purchased a class set of 30 for the 6 elementary art teachers to share. Our coordinator has us sign them out for a period of time and when the next teacher wants to use them they travel. To accommodate a traveling set we use the following set up:


I know. It looks like a hot mess up in there, but I'm gonna unpack it for you.
So first, there are the boxes that they came in. One idea we had was to number them, match them up to the kid's number and have them set the box on their table to place the pencil back in the box. One teacher test drove that plan and found it wasn't too practical. So most of the time, the boxes just sit empty in the big tub. Like this:
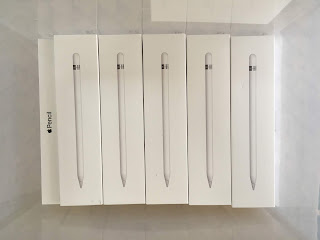


Since students need to take the cap off to pair the device to their tablet, we had to decide what to do about the caps. We envisioned them getting lost. The alternative was not giving the students the caps. That leaves the end exposed. After weighing the pros and cons, we went with that option and store the caps in a smaller container with extra pencil tips and anything else that is tiny. We keep them plugged into the chargers whenever the students aren't using them.


We have a surge protector for charging. It has three plugs for each of the Anker Powerpots. These can charge up to 10 pencils at a time in a very compact space.
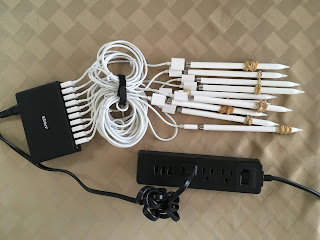


We leave the wires all bundled up and out of the way. Leaving them at the full 3' or 6' length would probably mean a huge tangled mess or that they would get knocked onto the floor. Here's what it looks like with 3 units plugged in at once.


When it's time to send them off to the next teacher the pencils go back on the boxes and away they go.


Some other tips for classroom pencil use. With our situation, I told students the pencil had to sit on top of their ipad whenever they got up from the table or weren't using it. Their ipads have a rubber case that sticks up around the edges, so it won't roll off the ipad if it's lying flat. Those pencils are slippery and roll fast so I added a rubber band to each one to act as a pencil grip and to slow down the rolling.


What are your best secrets for managing apple pencils in the elementary art room?

Thursday, April 5, 2018

Paint Storage Solution


Since it's still snowing in April, and we had Spring Break last week, my fourth grade monochromatic landscapes have been taking a very long time. Using some bins that I had in the artroom we can now save the paint for over a week. I'm also using this at my other school to prep my paint in the morning for classes that are back to back with no passing time. Now I can greet my classes at the door instead of doing that harried dance of running to the hallway after filling each table to see if the next class is on their way.

** Update **
I have a different set up at my second school... paint still juicy after being away for almost a week.


Wednesday, October 18, 2017

AOTW aprons


The students are loving the choice of a special apron when they are the "Artist of the Week"
They are hung with inexpensive temporary stick on hooks and they are low enough that students can get them and hang them back up themselves.

Friday, October 13, 2017

Can Do Statements

New Updated Bulletin Board. Each grade also has their own bulletin board of the same color with project samples. The crayon labels have acetate on top to turn them into Dry Erase friendly spaces.


Definitely an improvement over year one


and year 2-5


I carry the K-5 grade level rainbow theme into all aspects of planning and display. Their Artist of the Week display in the hall has the same color background paper. The preview board in the classroom with a sneak peek of the lesson, same color. My printed schedule for subs... you get the idea. Need help getting organized? Free example available here.

Thursday, September 7, 2017

Apron Life Hack

Our gym teacher was getting rid of three dozen brand new nylon pinnies last year. I immediately thought these would be great aprons for my elementary students. I was planning on placing them in a box next to the sink, when inspiration struck. I usually avoid announcing aprons because it becomes a mad dash and wastes 10 minutes. Now it's easy on, easy off right from their seats.


Check with your PE teacher. From a quick search online, "pinnies" seem far cheaper than art aprons. These came 12 in a bag and have no label or other identifier.

Sunday, March 13, 2016

To Bin or Not to Bin

Do you leave table bins out for all classes of common essentials, or do you have each class pass supplies out as needed?


Thursday, March 3, 2016

Hang ups

Last week the music teacher asked if I had a need for some nifty bulletin board pins. I was picturing pushpins with glitter or something equally tacky. The kind of bizarre thing that makes people think of an art teacher. So I was pleasantly surprised when she handed me a box of these.
The design is very sleek and allows me to quickly pin work in the hallway or wherever WITHOUT staples, thumbtacks, t-pins or other nonsense. When I decided to order more I found them on amazon and staples and they are a bit pricey, but I've decided to invest in this timesaver. I swap out 28 artworks every week to have a rotating "Artist of the Week" represented from each one of my classes. My previous system of thumbtacks and binder clips was functional, but not this easy.  With the binder clips, if you don't find the exact center, the artwork would hang lopsided. If I was hanging 12x18 or larger I needed two clips. These are sturdy enough to only need one, which means I can hang up in half the time. And, if you're like me, you won't have to run back to the art room when you are hanging up your 3rd of 25 artworks and realize (again) that you're out of staples. Every. Single. Time.


Wednesday, December 9, 2015

Test Tiles

Sometimes you just need to follow the experts. I've been making test tiles the way my college professors, cooperating teachers and mentors made them. Actually, my first two years of teaching elementary, I didn't make them at all, I just relied on the catalog pictures and any finished project samples laying around from the previous teacher.


Last year I decided to use mini cookie cutters to help me quickly separate the glaze by brands. So my Amaco are square tiles, the Sax are round and the new "Teacher's Palette" are gingerbread men. As I'm painfully painting the 3rd coat on my 20th gingerbread man I think to myself "I guess this is why the paint your own pottery stores just put a drop of each color on one tile." DING! DING! DING!

Yes! Firing all these little dudes, while completely adorable, was a complete and utter pain. So I grabbed a blank tile leftover from the previous teacher's mural project and was able to knock these out in less than 10 minutes:


I did make a little cheat sheet for myself on scrap paper so I would remember where each color was on the tile. Obviously this tile is not representative of ALL the colors of clay that I might use, but if I make a few slabs of each color clay, I will have a few ready. Not sure why teachers don't do it this way - maybe they don't want students to see ALL the colors, but I'm fine telling them "We're out of that color right now."


And while I've never done a color theory lesson with glazes, I could see how the Teacher's Palette line would be an easy one to try. The above tile is a color wheel using scarlet, lemon and midnight blue. The secondaries are pretty good.

I would love to hear your test tile tips and tricks.

Friday, October 9, 2015

Throw your sponge away

I have to put this idea out here to the universe because it makes so much sense to me, but no one else does it. I don't give kids sponges to clean up unless there is a tsunami of water spilled. I keep seeing the pinterest job board signs of table washers and turbo dryers and I don't get it.

Ready for my clean up plan? It's gonna blow your mind. 

No sponges.

When they wash & dry their hands, they use that paper towel which is now partially damp to wipe off their desk. It almost always has the perfect amount of water on it, and it doesn't need to be dried.


Free poster you can print and tape above your sink to remind them not to toss that towel.


Saturday, January 24, 2015

Post It Note Directions


A lot of times I like to leave step by step illustrations with my sub plans. What I often find is that on step 7 out of 9 I make a silly mistake or realize I drew too big and they won't all fit on one page. I started doing the steps on mini post it notes. Then I can stick them on a sheet of copy paper in order when they are all done. You can slide them into a plastic sleeve if you're afraid they will fall off. This is also great if you decide to change it up from year to year. Or if you find less steps are necessary. I also like having the boxes the same size. This could probably be photocopied to give to students who were absent during a previous class. (Darker post it colors may not work, but yellow should be ok).


Tuesday, January 6, 2015

Clay stampers to label clay

Individual letters are a great way to have students label their own clay pieces. I usually scratch their initials and class code on the back. I'm always afraid I won't be able to read their writing, or that they will squish or collapse their piece. This is something they could do on their own. It would also be a quick way to quickly add the class code to each piece after the students leave.


Sunday, September 28, 2014

Simple Display System

I've implemented a student artist of the week program at my schools over the past three years. In addition to a certificate and having their work added to our Artsonia online art gallery, this year the students will also have their work on display in the classroom for the week. With 12 sections at this particular school I had to find a simple way to switch out the art quickly. Using thumbtacks and binder clips I think I have my answer. I also display the boards in chronological order (which helps me get the work up and down and back into the right folder faster. Each class has their homeroom teacher name at the bottom and I use the grade level color code for the background color to help the students easily find it. Simple. Inexpensive.


And yes, I totally realize how lucky I am that my 6' cabinets are all covered in bulletin board material. I highly recommend that as well!

Sunday, June 8, 2014

Getting Ready for Your Sub

Nothing makes me cringe more than the thought of being absent from school. We are currently having a terrible shortage of subs (made the front page of the news today in fact) and so instead of having one person in my room all day, there might be other teachers or administrators covering my classes. EEK! All the more reason to tidy up and make sure ANYONE can walk in and deliver a 40 minute lesson.
This year I started a sub shelf. It is eye level behind my desk directly above the printer. There is a note to the sub that is under the clear desk mat directing them to self-select from that area in the event they can't follow the art lesson for the day.


I've included the "Getting to know the world's Greatest Artist" series, How to Draw books and sub-friendly lessons (inside the binder).

Art Teacher's Guide to Organization

It there is something that Charlotte has made abundantly clear this spring, it's that my strengths as a teacher lie in organization and planning. If that's your weakness, one of the easiest things to jump start your organization is color coding. One of the worst things to do is spend four hours looking through pinterest. It's kryptonite, I know.  Here is something you can do TODAY that will yield time savings TODAY.

Place your important stuff, notes to your sub, your schedule, etc on your desk. Place a piece of plexiglass (or if you can afford it, a see-through desk mat on top). Use colored markers and color code grade level (or course, if teaching high school). Every day before you leave, make sure that area is clear so a sub can jump in if needed.


Under my mat I have: Color coded schedule, A note to the sub, The district, what to do in case of emergency card and my class counts (the number of kids in each grade level or by each day - so helpful when counting out supplies or making photocopies).

I have the rest of the steps posted for free over at Teachers Pay Teachers. Enjoy!

Saturday, May 31, 2014

The Sponge Hierarchy

Last week I had to take a personal day and had laid out things for my sub as best as humanly possible. As I went to flip the lights off something caught my eye and I had a moment of sheer terror. I had left my "good sponges" out in plain sight. Good sponges. What if my sub wasn't sponge-worthy? I can't be alone in the coveting of a good sponge. Here's the hierarchy as far as I know it.


Level 1. Brand new sponge. Glorious and yellow from the cellophane packaging. A new sponge gets cut into thirds or sometimes quarters right from the package. (Sponges don't grow on trees, y'all.)
This sponge can only be used for printmaking. Once it mops up a table or something with glitter, it's all downhill.
Level 2. Once students have misused a printmaking sponge it can be used for moping up small spills by the teacher. This sponge is still too pretty to be given directly to students.
Level 3. Your everyday free range sponge. This can be used by anyone for just about anything.
Level 4. This sponge has seen better days. When wrung thoroughly the water from this sponge is always slightly gray and smells of gym socks. It can be cut down into shapes for sponge painting or stamping. Several of them can be used as packing peanuts for taking home clay projects.
 

Tuesday, April 22, 2014

Word Palette

Much more fun than a "word wall." I color coded the words to the colors I use for each grade so that when a lesson is over, I can easily spot and take down the key words and add the new ones. I sketched the shape on bulletin board paper and then cut away the palette to show the brown cork underneath. The letters are hand written with a thick marker, but you could cut them out if desired.

I saw a similar bulletin a few months ago on pinterest but apparently didn't pin it! If it was you, I'd love to give credit. Let me know who you are!

Wednesday, January 16, 2013

RIP Markers

My students have recently been doing a lot of marker work. Before I knew it several students had just been tossing the markers in the trash so I needed to train them that I would be the only one to determine when markers are truly "dead." So I made this cute easy container for the markers to "Rest In Peace" because sometimes, markers come back from the dead. The students seem to be enjoying this and not "forgetting" to save the markers. At the end of a class the other day, a student asked if he could test the markers, so I let him and he cheered "It's ALIVE" after finding one was surprisingly juicy.